Can you believe it?! I have actually finished my 3 hour clothes making class skirt in just under 7 weeks!
Well, that’s enough of the excited exclamation marks, but I hope you can understand my glee in the skirt finally being done. I had thought it would be finished about a month ago, but what with waiting for the tutor to show me things, and queuing for the overlocker I finally finished it on Monday.
Before I show you the final thing (yep, am going to drag it out even longer – scroll straight down if you simply can’t wait), I’m just going to explain how I did the hem so that I have it recorded.
Before finishing the hem the skirt was levelled whilst I was wearing it. We did this in pairs – me wearing the skirt and Lorna using a ruler to measure evenly all round the skirt from the floor. She then marked this distance with pins. This would be a great time to use my Nan’s hem marker if you were on your own.

I then just cut along the pinned line and used the overlocker to finish the raw edge. After folding the hem up I stitched it in place. Done.
For the lining hem I was shown another way that is meant to be good for less straight skirts than this one.
Again I put the skirt on, and someone pinned where the purple layer of fabric hung down to on the lining. Don’t want the lining hanging down longer than the skirt now do we?

After cutting the excess away I stitched a line about 1cm from the edge.

Using this line as a folding line I folded the hem up towards the waistband and pressed.

I then folded it up again, enclosing the raw edge, pinned and then sewed the hem on the machine.


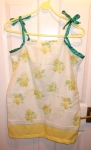
After a final overall iron, my skirt was finally finished!!


Despite the long drawn out process, I know I learnt an awful lot whilst making this skirt, and think for an elasticated waistband it looks great!