Pyjama Party!

After yesterday’s post of being frustrated about not really making much at the moment, I decided a simple project might be better than nothing at all.

A week or so ago Karen over at Did You Make That launched her Pyjama Party sewalong, which gives me the perfect opportunity to make some PJ bottoms that actually fit my belly, join the other 100+ party goers, and make a project that hopefully won’t require me to spend hours kneeling on the floor cutting out pattern pieces. All in all a good idea I reckon!

I’ve just ordered the pattern below (couldn’t find the one Karen recommends), mainly because of the dashing young couple on the front 🙂

Next I need to find some suitable fabric…

Image source
http://onlinecraftmall.com.au/Simplicity-9871-Sewing-Pattern-Its-So-Easy-MissMen-Sleepwear-P1592598.aspx

1940s patterns – which one to choose?!

Next week I go back to school, and I am doing a course called Vintage Fashion: 1940s and 1950s.

For the course we are required to bring a 1940s or 1950s inspired pattern, so I have spent the last little while looking on eBay at 1940s patterns! While I know that 1950s style dresses suit me well I already own a couple of dresses and patterns, and think there might be more scope for learning new techniques in the 1940s dresses.

Here are some of my favourites – most of which come from The Vintage Pattern Store eBay shop. If you click on the image it should take you to the eBay listing itself.

Now all I need to do is decide which one to get!

The Best Parcel EVER!

Over the weekend possibly the highlight of my blogging career happened – I won a competition run by another blogger!

Joanne over at Stitch & Witter reached her 100th blog post, and to celebrate hosted a giveaway which I won – WOOOOHOOOO!!!

And in the post today arrived this pretty little package…

Full of pretty little things…

I can’t wait to make the pattern when I am a bit less lumpy, and will be on the lookout for white gloves and a parasol to complete the outfit as per the model in the middle (although she appears to have mislaid her legs – I will try not to do that).

Thanks Joanne!!

My 1930s dress toile

You may or may not remember long long ago in January when I told you about the 20s and 30s inspired pattern making course I have been doing this term.

I started by gathering inspiration, and then came up with the one on the left as my final dress design.

With the sleeves to be beaded something like this.

Rather than design and make a dress that would rarely get worn, my intention was to make a slightly more practical dress. However, a practical dress meant that I wouldn’t learn as much, so practicality went out the window! I lengthened the skirt to floor length, cut it on the bias (at a 45 degree angle to the normal grainline), and added a more shaped dropped waistline. A whole new dress really!

I made the pattern to my pre-bump size so am not actually able to fit it at the moment. This means I have only made it to the toile (rough) stage. And this was it before my lesson this morning…

It is very rough, and the cheap and nasty polyester that I got to do the toile either doesn’t press or melts under the iron, so it was a tough job getting all the seams looking anywhere near good!

By making this toile I was able to see what needed altering on my pattern to make it work better. For example, I had sewn the bust darts too long, so altered my paper pattern by shortening them by 2cm.

You can also see from the photo that the sleeve is a bit flat and isn’t scalloped yet like my initial design.

To remedy this I first marked three points on the sleeve and slashed up towards the shoulder.

I then added more fabric under the existing sleeve to add extra width.

The next step was to measure how much fabric I had added, and transfer this to the paper pattern. In the case of the middle slash, I needed to add 4cm.

By doing this for all three slashes, and then taping pattern paper into the gaps, I had created a fuller sleeve.

I then added the scalloped shaping and toiled the new sleeve. Much better!

I found this bracelet that I made, and am wondering if something like this would be nice on the sleeve edging (you need to use your imagination a bit for this – I only pinned it on!).

In a similar way to altering the sleeve, I also dropped the neck a bit but will have to make my final decision when I can get in to the toile to see exactly where I would like it to sit.

I also learnt about cutting and sewing on the bias, ways of finishing vintage dresses rather than lining them, and some other stuff, but I think I might save all that for other blog posts so that I don’t bombard / bore you with them all today!

Have a good weekend everyone!

Image source
http://vintagetextile.com/new_page_155.htm#bot

Pattern Making: Bodice block to toile

In my pattern making class we are focusing on the bodice this term. You can see my first post about where bodice darts come from here.

We started by making a basic bodice block. It is by altering this block that other patterns can be created.

Front bodice block

Here you can just about see the bust and waist darts.

Back bodice block

This particular block has one dart from the waist.

Sleeve block

These blocks are all made to a standard size 12 using a formula. There are lots of different pattern drafting books, and each author has their own formula and way of producing a block it seems.

From these blocks, you can then create a pattern by drawing round them and adding seam allowance. You also have to transfer all the relevant information from the block, such as dart points, balance marks etc.

Front and back pattern

Sleeve pattern

And then from the pattern you can make a toile! In this case, the toile was made to check that the pattern works, and whether the notches for attaching the sleeves were in the right place (they weren’t!).

The sleeves are hanging slightly forward, which is the correct way (phew!).

So now that I’ve made the amendments that were necessary I should be able to use by initial block to create other styles.

Jumping on the New Look 6000 bandwagon

After seeing the New Look 6000‘s popping up all over the place I decided for my next project I was going to come late to the New Look 6000 Frock Fest set up by Scruffy Badger, and make my own.

My first problem was my growing tummy, and the fact that this is a fitted dress. I need not have feared though as Handmade Jane came to the rescue! Jane made her NL 6000 from a bright red double knit, which I thought might just work for me as its a stretchy fabric. Jane also agreed and gave me a few pointers on how to make it – I could skip loads of steps basically – yay!!

So having got the fabric sorted, I was ready to start. Here was where I faced one of the most annoying problems in making your own clothes from commercial patterns. How the blinkin’ ‘eck are you meant to get them back in their teeny tiny little weeny envelopes once you’ve unfolded and used them??!.

Believe it or not, all that came out of the envelope on the top of the pile. There are quite a few different versions of this dress, which means there are lots of pattern pieces. Short of ironing each piece when it is folded to make it as flat as possible (which I certainly can’t be bothered to do!), this was the best I could manage.

Imagine my despair when I realised I’d cut the wrong bit out and had to take everything out again to find the right one…!

I have actually finished the dress now, but am waiting for a good hair day to take a photo to show you properly :-).

And if you scroll down a bit on the right of my homepage, I have added a new widgety thing for the  New Look 6000 Frock Fest, but am not sure it’s working quite right yet?

Image source
http://sewing.patternreview.com/patterns/42644

Vintage Maternity Patterns

It had to happen some time really!!

As a fan of vintage clothes and patterns (for the pictures at the moment, have never actually sewn one!), I have been doing a bit of exploring on Etsy to see what might be out there for me to try or buy.

Here are some of my favourite patterns so far.

This pattern is from Zombarella, and I’ve been admiring it for a few months now. While it looks great in the illustration, my main concern is how tent like it might make me look.

FREE SHIPPING Vintage 1950 Simplicity 3196 Sewing Pattern Maternity Dress and Bolero in Misses Size 12 Bust 30

Now, I’m not entirely sure where these women are hiding their bumps, or how they are managing to have a waistline, so I would be intrigued to get this pattern just to understand how it even works!

Vintage Misses Maternity Dress with "Let-Out seams" Simplicity Pattern 6590 Complete 1966 size 10, Stylish

I love this dress from Cherry Corners! And the one below from Classic Cabin.

Maternity One-Piece Dress in Misses' Sizes, Vintage 1965 Sewing Pattern- Simplicity 6023

And finally here is a slightly more modern 70s number below, from Erika With a K. I think the maxi dress on the left would be super comfortable in the summer when I am HUGE!!

1970s Maternity Dress Top - Vintage Sewing Pattern McCall's 4637 - 38 Bust UNCUT

Now all I need to do is narrow down these and the 20 or so others I’ve found, and decide which ones to buy. Hope no-one beats me to it!

Image sources
http://www.etsy.com/shop/Zombarella?ref=seller_info
http://www.etsy.com/listing/41929444/free-shipping-vintage-1950-simplicity
http://www.etsy.com/listing/77767835/vintage-misses-maternity-dress-with-let
http://www.etsy.com/listing/89698714/maternity-one-piece-dress-in-misses
http://www.etsy.com/listing/89279861/1970s-maternity-dress-top-vintage-sewing

Basic Bodice Block

This term in my Pattern Cutting class we are working on the bodice. From what I’ve been led to believe, this is slightly trickier than skirt patterns that we were working on last term.

So far we have understood where all the measurements for the bodice come from, and then drafted a basic bodice block using a standard size 12.

Hopefully I won’t get in trouble for using these, but I thought it might be useful to see how a basic two-dart bodice comes together from a flat piece of fabric. It helps explain why we have darts where we have darts.

As far as I know, all images are from Basic Pattern Skills for Fashion Design by Jeanne Price and Bernard Zamkoff.

This first image shows a flat piece of fabric wrapped round the body to create a cylinder.

By creating cones of fabric, or darts, above the bust the fabric shapes to the body. These are called the shoulder darts.

The same is done for the waist. These darts are then turned inside and sewn. The flat version above is the pattern for the two-dart bodice. From this basic pattern or block you create different types of top.

I don’t think I’m quite up to explaining how to draft your own block, but if you’re interested then I found a Basic Bodice Block tutorial on the BurdaStyle website that looks quite good!

Pattern Adjustments

At the moment I seem to be following two schools of thought when it comes to clothes making from commercial patterns. However, as I sit here about to start typing I think I may have just come to the realisation that if I combine the two things will become much easier!

The first way I have been doing things is to take my measurements, find the nearest size that corresponds to those measurements on the pattern and then make a toile. From the toile I then have been making the adjustments I need, transferring them back to the pattern and then cutting out the proper fabric.

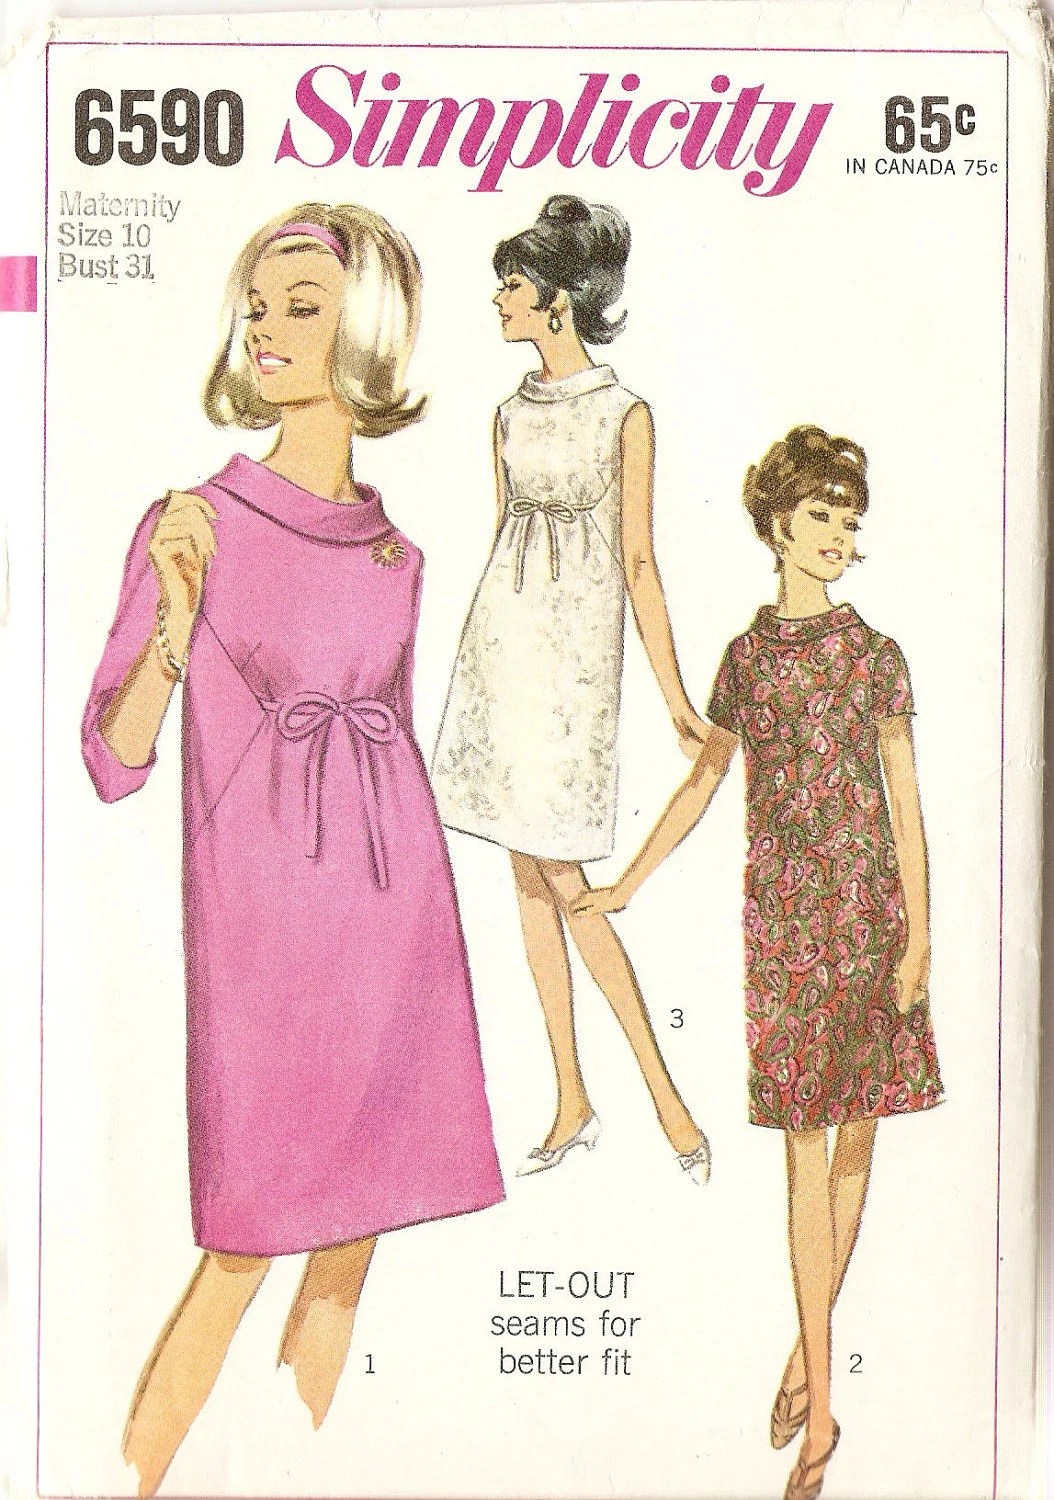
In my Clothes Making class it is done a bit differently, and no doubt more correctly! From the tight restrictions we have been given, this is the pattern that I have chosen (option D).

Rather than making a toile, we took all our body measurements and then worked directly with the pattern to make any alterations that are needed. This is what I had to do.

Make front larger than back

Unless I am very unfortunate, I am not anticipating my shoulders or back to grow at all while I’m pregnant! Therefore my measurements are a bit skewed as I will stay a size 12 everywhere except around my tummy.

On a commercial pattern you cut out along the line according to your size. Here you can see the four different options:

For everything except the front I cut out a 12. For the front I cut out a 14. If I just left them like this though, the front and back would not fit together as they are two different sizes. To overcome this the extra fabric from the size 14 front needs to be redistributed. As you can see from the picture, the top has pleats and these pleats can be made bigger to use the extra fabric. Lost?! I was for the first few explanations from my tutor!

Maybe some diagrams will help.

Here you can see the uncut front of the top, with the size 14 being the outer line.

The difference in size between the 12 and the 14 is 1.4cm, as shown in blue on the left.

This 1.4cm can be incorporated into the front of the top, by making the pleat bigger. The pleat is the boxy thing in the middle of the pattern piece, and the red lines show where I have made it bigger – 7mm on each side, which adds up to the 1.4cm difference between a 12 and a 14. This will mean that the front (size 14), and back (size 12) will now fit together in construction. I hope.

As additional bump accommodation, I have also made the middle pleat (here shown on the right of the pattern piece) bigger by extending it to the edge of the paper. Shown by the purple lines.

Shorten the top

I also made the top shorter than suggested by removing a section of the pattern using the double black lines on the front and back pattern pieces.

The distance between the double balck lines and purple line is what I need to remove by folding the pattern up.

New shorter top!

Check the shoulders

I then needed to check the shoulder position. Fortunately I didn’t need to adjust this. But I checked like this.

As you can just about make out on the pattern, the neckline is 6.5cm lower than the nape of your neck (nobbly bit at top of your spine). So I measured up 6.5cm from the neckline using the set square, then used a tape measure to measure across to the shoulder. Thankfully it came to 20.5cm which is just about near enough my measurement to be able to leave it as it is!

Bump room

Lastly I added one little extra, a half circle at the bottom of the front, which will mean that as my bump grows the hemline should stay level rather than lifting up!

Phew, I hope that made sense!

Back to my initial break through at the start of this post… I’m thinking now that if I start by making alterations to the pattern using my measurements, and then make a toile, and then make further alterations from that, I should have a very long-winded but fail safe way of making clothes that fit me perfectly, no? We shall see!

My First Pattern

Despite my recent joy at being able to sew for me again, over the last couple of weeks my sewing has annoyingly ground to a halt from being ill.

This little inconvenience has made it quite difficult to think of things to blog about as I haven’t made anything, my lessons have now finished for Christmas, and sometimes I haven’t made it out of bed!

However, I realised today that I had forgotten to share something I was quite pleased with. In my last pattern cutting lesson I finished my first ever real-life proper could-actually-make-a-skirt-from-it-and-wear-it-out-of-the-house pattern!

Way back in September in our first lesson we were asked to choose a skirt we liked from a selection cut out of magazines. The intention then was to learn lots over the term, and be able to turn the photo of the skirt in to a pattern. This is the one I chose:

I chose it both for it’s colour and simplicity, and I think I secretly wished I was the girl in the photo – very glamorous 🙂

When it came to creating the pattern, I started by making a skirt block to my own measurements in full-scale. It’s been rolled up for a while so please excuse my slippers and the fabric at the top weighing it down.

The block is then used to create the master pattern, where you do all your workings out etc. When doing this it became apparent that my blocks weren’t quite right.

Despite measuring myself, I managed to put the hip line in too low (it should be about 21cm, I had put mine in at 25.5cm) and I hadn’t shaped the waistline at the top. I rectified both of these things in the master pattern below.

The photos aren’t brilliant, but hopefully you can get the idea that it is here on the master pattern that I made all the changes to the basic block shape that I wanted to create the right pattern for the skirt. I have made lots of scribbles and notes as to why I have done things.

Essentially it is just a simple straight skirt with a pleat down the front. The pleat is the hatched area on the right.

At first I drew the pleat straight down, but to make it hang better I moved it outwards at the bottom by 1cm. This also moved the grainline and centre front (CF) slightly.

In order to be able to walk easily in the skirt I moved the centre back (CB) line out by 1cm at the bottom, and extended the front and back by 3cm (this is a standard measurement to use, although I couldn’t tell you why!) on each side from the knee. By doing this it meant I didn’t have to have a seam down the back to then be able to make a split for easy walking.

Extending CB out by 1cm

Extending sides by 3cm at knee

As I had decided that I didn’t want the back to have any seams or a zip, I have marked where an invisible zip would go on the left side. Initially I had had it on the right with a seam down the CB.

Once all that jiggling around was done, I taped the master pattern down to the table so that I could then trace off a final skirt pattern, omitting all of the scribbles and things I didn’t need.

So here is my first ever finished proper pattern, with a waistband, all ready to be made in to a real life skirt!

Admittedly it was a much simpler skirt than some others in the class, but it’s nice to see how to put together everything that we learnt in the term. Well done me!