Remember me…?

Well, it has been an awfully long time since I said hello from Peggy’s Pickles – 16 months to be precise!

Although the lack of blogging suggests I have been completely consumed with nappies, sleepless nights and games of peek-a-boo (all of which have happened in abundance), I have in fact been quite productive on the sewing front as well. I don’t have that many photos but this is a list of all the things I have made since my little boy was born:

Baby quilt, done a local sewing course, embroidered cushion cover, scout woven tee x 2, sorbetto top x 1, drafted my own pattern from an existing jumper and made the jumper, made the jumper again for my sister, learnt to knit, knitted a scarf (which will never ever ever ever be done again, my word – the stress), two thirds of a granny square crochet blanket, t-shirts x 2, renfrews x 2, Clover trousers x 2 (although one pair may not count as they have stretched beyond all recognition), done a Craftsy course and…

IMG_0541        IMG_0721

                      made a hoodie with a very big hoodie, self drafted trousers

              IMG_0785         IMG_0806

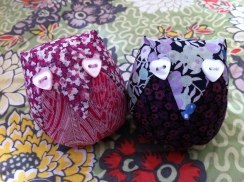
             Lucy Tunic for my niece (not the cardigan!), an owl pin cushion

                 406950_10151156211083667_824468612_n        389251_10151656926722372_709367364_n

Wedding present pillows, lots of Flashback Skinny Tees

               541284_10151231388997372_676429907_n         1003351_10151784870127372_1357969572_n

Minikrea elephant trousersOliver + S Sailboat jumper and self drafted trousers

    1009912_10152951108850165_629097827_n     IMG_0679

Baby sling, and tee-pee (my fave!)

IMG_0996

And lots and lots and lots of baby trousers!!

This leads me on to make another announcement (no not more babies) – I have started my own business!

You can find my shop on Folksy here: http://folksy.com/shops/LittleBiscuit

In a nutshell, I am designing and making baby clothes from up-cycled fabric. The shop opened today and I will share the story of how it came about in my next blog post. In the meantime, do go and have a look and pass it on to all your friends!

Hello Everyone!

Things have been very quiet here at Peggy’s Pickles for the last few weeks as we had a very early arrival!

Technically he still should still be in my tummy, but three weeks ago our little son decided he’d had enough and wanted to see the world.

A tough few weeks have followed with 8 days in intensive care, but he’s home now and we’re all muddling through.

It means I might not be doing much sewing for a while, but will be back as soon as I can 🙂

A little bit of help

With my belly reaching gargantuan proportions, but still having things I want to get done, the whole fabric cutting situation needed a big rethink. So who should come to my rescue but Dave!

Normally it is best if I leave the room when Dave does anything DIY related as I’m not very good at biting my tongue when I can see a ‘better’ way of doing things. But in this case, I had to be present, and the whole exercise proved that we do indeed have a strong marriage – bringing up a child should be a breeze now!!

Although Dave did tackle the pattern master, when it came to measuring it was the tool box tape measure rather than the sewing box tape measure that was used, just to keep things a bit more manly.

Hopefully I’ll be able to show you what all this was in aid of soon!!

My 1940s Dress

Just like me in general, my blogging has become awfully slow recently! With only two months, almost to the day, to go until our little wriggly baby arrives I am feeling somewhat cumbersome these days and everything is taking me a bit longer than it used to!

Even though I’m not making very much at home, I’m still going to college so I thought I’d share with you where I’ve got to with my 1940s dress.

Having found a squillion patterns that I love at The Vintage Pattern Store, I managed to narrow the choice down to this one.

Originally I was going to use the existing pattern to make a toile and then a final dress, but a couple of factors changed my approach:

1) The point of a toile is to check for fit before making the real garment. However, when you look like this, it is unlikely that many things are going to fit you no matter how many toiles you do…

2) Pattern cutting is the element of all the courses that I do that I enjoy the most, and want to learn the most about. So just using an existing pattern won’t help me develop those skills very much.

SO, instead I am creating the dress pattern from scratch using the image above as reference. I have my pre-pregnancy measurements so am using them in the hope that one day I may shrink back to normal size! I can then compare my pattern with the original at the end to see how we approached things differently. I’ll also make a toile once I’ve done the pattern, but won’t be able to fit it for a while!

So far I’ve used the same bodice block as I did for my 1930s dress, and created a basic dress block. It is then from these that you make adjustments to create the different elements of the dress – that’s the fun bit!

This is the front of the dress, with all the different bits still in one piece. The next stage is to isolate each section (eg skirt, or bodice), and then make any adjustments needed.

This is the bodice pattern piece.

I then moved the bust dart to the shoulder to allow me to create the pleats on the shoulder of the dress.

There are a few stages in between, but in the photo below I have added the shoulder pleats to the pattern, and opened out the bottom of the bodice to create the gathers at the front of the dress where it meets the waist.


See, I look just like the model in the illustration!

Jack Sprat would eat no fat…

… And his wife would eat no lean…

No, it’s not baby brain finally taking over completely, it’s my favourite textile design from an exhibition I saw a few days ago at the Fashion & Textile Museum, London.

Called Designing Women: Postwar British Textiles, the exhibition shows the work of British textile artists working after the Second World War, and how they radically changed the industry with their modern designs.

The exhibition mainly focuses on three women: Lucienne Day, Jacqueline Groag and Marian Mahler. Ever since finding out about Robin and Lucienne Day at Uni and then learning more on my Masters, I have admired their work for its influence and simplicity, its use of innovative materials, and the fact that they seemed an awfully glamorous couple!

So this exhibition was a good chance to see a large selection of Lucienne Day’s textiles in one place.

Here are some of my favourites from the exhibition. Considering these were mainly done in the 1950s, I think they’re still remarkably modern. I’d definitely have them in my home!

Calyx
Lucienne Day
1951

Calyx was Day’s most popular design, and launched at the 1951 Festival of Britain. It was manufactured by Heal Fabrics, who initially were skeptical of the avant garde design. However, after winning awards and international acclaim they soon embraced this new modern style.

Too Many Cooks
Lucienne Day
1959 

Miscellany
Lucienne Day
1952 

Fall
Lucienne Day
1952 

Magnetic
Lucienne Day
1957

Composure
Paule Vézelay
1967

The textile design above is by Paule Vézelay, who I had not heard of before. Her designs however were some of my favourites in the exhibition, I love the bold colours, and the shapes are far less fussy than some work done by the other designers. Nice and simple!

The exhibition is on until 16 June if you fancy it, and a full price ticket is £7. While the textiles are undoubtedly nice to look at, there is quite limited information and interpretation so I did leave a bit disappointed, and felt like I didn’t really find out too much about the period or the designers themselves. For that you should go and see the monster British Design exhibition on at the V&A at the moment!

Image sources
http://designmuseum.org/design/robin-lucienne-day

Gathers

Last term in my clothes making class I found out why my gathers never really worked. Although I may be the only one who didn’t realise how to do them properly I thought I would share with you what I learnt!

I am using a sleeve from my Mum’s maternity top to demonstrate.

The three stars show where the tailors tacks are. To create a gather, you need to sew two lines (not one as I had previously thought) of long stitches, without reverse stitching the start or finish of each line. This is known as basting (another thing that I thought only applies to turkey’s at Christmas for quite a long time :-)).

These lines of stitching should be between the left and right tailors tacks. They should also be within the seam allowance (normally 1.5cm on commercial patterns).

To create the gathers, you take hold of the threads at one end of the stitching and gently pull them. You can spread the gathers evenly using your fingers or a pin. By sewing two lines of stitching, the gathers lie much flatter and therefore sit better when you join them with another piece of the garment, in this case the sleeve joining the sleeve hole (not sure that’s a technical term!).

I hope that’s helpful to anyone else who, like me, was only doing one line of gather stitches, and then finding it very difficult to make them look nice!

Pyjama Party: The Worst / Best / Funniest thing I have ever made…

For those of you who read other sewing blogs, I’m sure you can’t have missed the fact that today is Pyjama Party day!

This is the grand finale of a sewalong run by Karen at Did You Make That?. After a frustrating week last week of not being able to make very much because the little person growing in my belly gets in the way, I decided making pyjama bottoms might be the perfect pick-me-up as they would be simple, not require too much bending over and cutting time, and apparently after the baby comes you live in jammies for a few weeks.

This is the pattern I bought.

Having been swept away by the couple on the front of the pattern envelope, I had another idea. PJs for me and Dave!! (Not matching though, hopefully we will never reach the matching stage)

Now, I’m not sure about the etiquette of having a BOY at the Pyjama Party. Do I need to get parental permission? Do we stay in separate rooms even though we’re married…?

Unfortunately though, two pairs of PJs weren’t meant to be due to the very late arrival of the pattern in the post (yesterday). Instead I have just made Dave’s as a thank you for how brilliant he’s been in looking after me whilst I’m pregnant. I am pretty sure I haven’t always been the easiest person to deal with, and it requires a man of great patience to run to the corner shop late at night without a whisper of a complaint, because I have a ‘craving’ for Coco Pops.

So, Dave’s PJ fabric. Now this is where it possibly starts to get a bit silly. The options were traditional tartan, or something a bit more ‘interesting’. Having been let loose on Goldhawk Road (a street in London with lots of amazing fabric shops) unsupervised, take a wild guess which I went for.

SHARK ATTACK!!!!!!!!!!!!!!!

Again, I must point out that I was shopping alone.

When the man in the shop found out I was being such a loving wife, he promptly said he would specially wrap my fabric up for me. (He meant the cellophane bag you see in the picture above, not the tissue paper and ribbons I’d been imagining :-))

Now, sharks aren’t neccessarily the most relaxing choice for a pair of jammies, but never fear Dave, Peggy’s got your back. She’s not scared of no sharks!!

Thankfully this was a super easy pattern with only one pattern piece, so they didn’t take too long to make. The tricky part was the fact that Dave was away while I was making them, so I had to guess a bit with which size to go for. Now that I have Dave and his measurements back, I should have gone for the smaller size.


And that is why I have decided these are the ‘Worst / Best / Funniest thing I have ever made…’ The fabric is awful / amazing, and the fit is veering on the clown-like, but they make me chuckle every time I see them. And that has never happened with anything I’ve made before!

Dave reading his grown-up book, in his grown-up PJs

I would say don’t worry, no-ones going to see you in these Dave, but now I’ve written a whole blog post on them!

(Thanks Karen for a great sewalong, it has made me laugh a lot, although not necessarily in ways I was expecting :-))

Image source
http://onlinecraftmall.com.au/Simplicity-9871-Sewing-Pattern-Its-So-Easy-MissMen-Sleepwear-P1592598.aspx

Adjusting trouser patterns

Today I’m going to explain how I altered the pattern pieces of the pair of trousers I’m making in my Clothes Making class.

First, I took (or remembered from pre-pregnancy days!) the following measurements:

– Waist: Smallest part around body (Diagram A)
– Hip: Widest part of lower body (Diagram A)
– Inside Leg. Top of inside of leg to floor (Diagram A)
– Outside Leg. Waist to floor
– Crotch Depth. Waist to flat surface while sitting (Diagram B)

Women Size Guide

Diagram A

Diagram B

With these measurements I was then able to determine which size of trouser pattern was the nearest match (remembering to allow for any ease included in the pattern), and make any fitting adjustments that were needed.

This is the front trouser pattern piece, after I have adjusted the crotch depth and length of trouser.

Rather than doing it how I did it, length of trouser then crotch depth, you should adjust the crotch depth first. This should be done of the back pattern piece.

On the pattern the crotch line is marked with a horizontal line (pink line). From this line, up to the top of the waistband is the crotch depth.

On this pattern, the waistband is a seperate pattern piece (not shown), and the top of the finished waistband sits 2.5cm below the waist.

This meant that I had to add 2.5cm, and the width of the waistband (minus seam allowance), to the crotch depth on the main pattern piece. After doing all of this, the crotch depth came to 1cm less than my actual measurement, which would mean a very snug fit and the possibility of not being able to sit down!

You should also add 1 – 2cm ease to the crotch depth. In order to make this adjustment, I cut a straight line through the pattern piece, between the top of the pattern piece and the crotch line.

I then spread the pattern open by 2cm (the additional 1cm needed for crotch depth to equal my own, and 1cm ease), and filled it with extra paper. This is the white line you can see in the photo above.

You should ensure that all lines on the pattern (e.g. grain line) still line up now the pattern pieces have been separated.

This alteration should then be done to the front pattern piece as well.

The next step was to alter the length. To do this I used my inside leg measurement, and compared it to the inside leg measurement on the front pattern piece. This is taken from the crotch line downwards, but stopping before the 2.5cm hem allowance.

It seems I am a little bit short, so I had to remove 2cm from the pattern. Most patterns have a horizontal black line indicating where adjustments should be made without altering the overall cut of the garment. Here I folded away 2cm of the pattern to make the trousers the correct length.

This was then repeated for the back pattern piece.

And those were the alterations I made! There are obviously many more that need to be made for a perfect fit, but that’s plenty for a beginners class I think!

Image sources
http://www.houseoffraser.co.uk/General+Sizing+Guides/M162_GENERAL_SIZING_GUIDES,default,pg.html
http://84.243.208.241/~kozomara/index.php?option=com_wrapper&view=wrapper&Itemid=282

Diamonds Are A Girls Best Friend

Yes, I firmly believe in the above phrase (Dave, that’s aimed at you. Did I mention I’m going to be getting a person out of me in a few months time? :-))

The reason I have quoted the song made famous by Marylin Monroe is because Dave took me to see a small exhibition (see, you brought it on yourself Dave) at the Getty Images Gallery just behind Oxford Street at the weekend. The exhibition commemmorates 50 years since the death of Marilyn Monroe through photographs and a display of costumes and dresses worn by the star.

It was obviously the dresses that we went for, and here is a selection for you to see. One of the things I thought was lacking from some of the exhibition was being able to see an image of Monroe wearing the dress, so I have tried to do that here instead.

  The Prince and the Showgirl

Gentlemen Prefer Blondes

Some Like it Hot

Bus Stop

Niagara

Gentlemen Prefer Blondes

There’s No Business Like Show Business

The exhibition is open until 23 May, and although it’s small I’d recommend popping in to have a peek!

Images Sources
Please click on each image to be taken to where I found it.

Pyjama Party!

After yesterday’s post of being frustrated about not really making much at the moment, I decided a simple project might be better than nothing at all.

A week or so ago Karen over at Did You Make That launched her Pyjama Party sewalong, which gives me the perfect opportunity to make some PJ bottoms that actually fit my belly, join the other 100+ party goers, and make a project that hopefully won’t require me to spend hours kneeling on the floor cutting out pattern pieces. All in all a good idea I reckon!

I’ve just ordered the pattern below (couldn’t find the one Karen recommends), mainly because of the dashing young couple on the front 🙂

Next I need to find some suitable fabric…

Image source
http://onlinecraftmall.com.au/Simplicity-9871-Sewing-Pattern-Its-So-Easy-MissMen-Sleepwear-P1592598.aspx