My 1940s Dress

Just like me in general, my blogging has become awfully slow recently! With only two months, almost to the day, to go until our little wriggly baby arrives I am feeling somewhat cumbersome these days and everything is taking me a bit longer than it used to!

Even though I’m not making very much at home, I’m still going to college so I thought I’d share with you where I’ve got to with my 1940s dress.

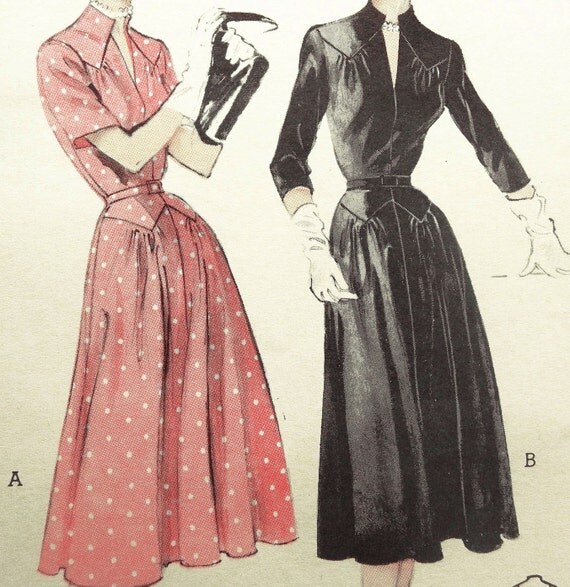
Having found a squillion patterns that I love at The Vintage Pattern Store, I managed to narrow the choice down to this one.
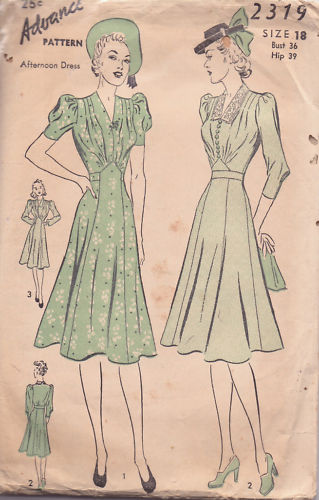
Originally I was going to use the existing pattern to make a toile and then a final dress, but a couple of factors changed my approach:

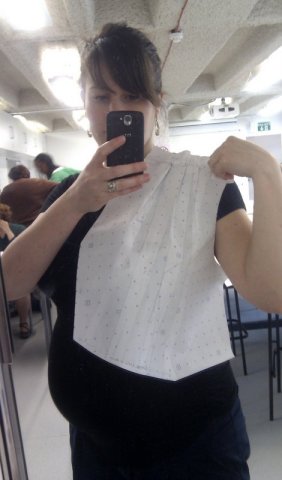
1) The point of a toile is to check for fit before making the real garment. However, when you look like this, it is unlikely that many things are going to fit you no matter how many toiles you do…

2) Pattern cutting is the element of all the courses that I do that I enjoy the most, and want to learn the most about. So just using an existing pattern won’t help me develop those skills very much.

SO, instead I am creating the dress pattern from scratch using the image above as reference. I have my pre-pregnancy measurements so am using them in the hope that one day I may shrink back to normal size! I can then compare my pattern with the original at the end to see how we approached things differently. I’ll also make a toile once I’ve done the pattern, but won’t be able to fit it for a while!

So far I’ve used the same bodice block as I did for my 1930s dress, and created a basic dress block. It is then from these that you make adjustments to create the different elements of the dress – that’s the fun bit!

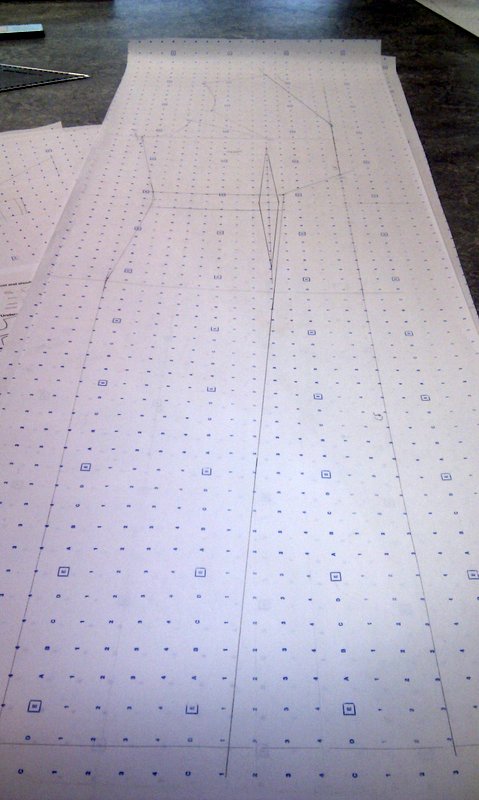
This is the front of the dress, with all the different bits still in one piece. The next stage is to isolate each section (eg skirt, or bodice), and then make any adjustments needed.

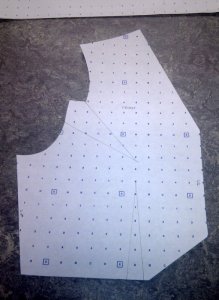
This is the bodice pattern piece.

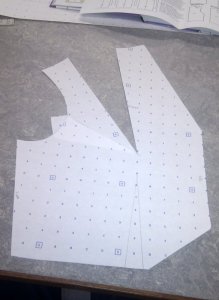
I then moved the bust dart to the shoulder to allow me to create the pleats on the shoulder of the dress.

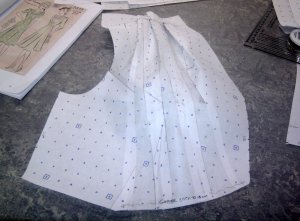
There are a few stages in between, but in the photo below I have added the shoulder pleats to the pattern, and opened out the bottom of the bodice to create the gathers at the front of the dress where it meets the waist.


See, I look just like the model in the illustration!

My 1930s dress toile

You may or may not remember long long ago in January when I told you about the 20s and 30s inspired pattern making course I have been doing this term.

I started by gathering inspiration, and then came up with the one on the left as my final dress design.

With the sleeves to be beaded something like this.

Rather than design and make a dress that would rarely get worn, my intention was to make a slightly more practical dress. However, a practical dress meant that I wouldn’t learn as much, so practicality went out the window! I lengthened the skirt to floor length, cut it on the bias (at a 45 degree angle to the normal grainline), and added a more shaped dropped waistline. A whole new dress really!

I made the pattern to my pre-bump size so am not actually able to fit it at the moment. This means I have only made it to the toile (rough) stage. And this was it before my lesson this morning…

It is very rough, and the cheap and nasty polyester that I got to do the toile either doesn’t press or melts under the iron, so it was a tough job getting all the seams looking anywhere near good!

By making this toile I was able to see what needed altering on my pattern to make it work better. For example, I had sewn the bust darts too long, so altered my paper pattern by shortening them by 2cm.

You can also see from the photo that the sleeve is a bit flat and isn’t scalloped yet like my initial design.

To remedy this I first marked three points on the sleeve and slashed up towards the shoulder.

I then added more fabric under the existing sleeve to add extra width.

The next step was to measure how much fabric I had added, and transfer this to the paper pattern. In the case of the middle slash, I needed to add 4cm.

By doing this for all three slashes, and then taping pattern paper into the gaps, I had created a fuller sleeve.

I then added the scalloped shaping and toiled the new sleeve. Much better!

I found this bracelet that I made, and am wondering if something like this would be nice on the sleeve edging (you need to use your imagination a bit for this – I only pinned it on!).

In a similar way to altering the sleeve, I also dropped the neck a bit but will have to make my final decision when I can get in to the toile to see exactly where I would like it to sit.

I also learnt about cutting and sewing on the bias, ways of finishing vintage dresses rather than lining them, and some other stuff, but I think I might save all that for other blog posts so that I don’t bombard / bore you with them all today!

Have a good weekend everyone!

Image source
http://vintagetextile.com/new_page_155.htm#bot

My 1930’s dress so far

Due to missing my 20s and 30s lesson last week, I am extra looking forward to my lesson today and can hopefully catch up a bit. Thank you for all the comments on which dress I should try and make – most of you suggested the one on the left below, which is also my favourite so we are all in agreement!

I think I might make it a bit longer though so it is more in keeping with the period. I’ve also been thinking about the sleeves a bit more. They were in part inspired by some David Hockney paintings I like (how on trend am I – didn’t even realise the Royal Academy were doing an exhibition of his work when I did this :-)), and partly by the middle Vionnet dress below.

I think I want the sleeves to be a bit more sparkly though, which would obviously be an awful lot of work. I just came across this 1930s dress on vintagetextile.com – aren’t the sleeves amazing! I would estimate me getting something like these done in approximately a million years. Maybe when the baby is old enough I can make it do it for me ‘for fun’ (just kidding!).

Image sources
http://thelendinglibrary.blogspot.com/2011/05/david-hockney.html
http://fashion.telegraph.co.uk/news-features/TMG5614830/Vionnet-exhibition-opens-in-Paris.html
http://vintagetextile.com/new_page_155.htm#bot

Pattern Making: Bodice block to toile

In my pattern making class we are focusing on the bodice this term. You can see my first post about where bodice darts come from here.

We started by making a basic bodice block. It is by altering this block that other patterns can be created.

Front bodice block

Here you can just about see the bust and waist darts.

Back bodice block

This particular block has one dart from the waist.

Sleeve block

These blocks are all made to a standard size 12 using a formula. There are lots of different pattern drafting books, and each author has their own formula and way of producing a block it seems.

From these blocks, you can then create a pattern by drawing round them and adding seam allowance. You also have to transfer all the relevant information from the block, such as dart points, balance marks etc.

Front and back pattern

Sleeve pattern

And then from the pattern you can make a toile! In this case, the toile was made to check that the pattern works, and whether the notches for attaching the sleeves were in the right place (they weren’t!).

The sleeves are hanging slightly forward, which is the correct way (phew!).

So now that I’ve made the amendments that were necessary I should be able to use by initial block to create other styles.

More of my drawings: 1920s & 1930s

On Fridays I have a class called Vintage Fashion: 20s and 30s. I love it!

What could be better than actually being allowed to spend a whole lesson in the library, just looking at beautiful dresses?

That’s what we did last week as research for our moodboards, which will then inspire our own designs, from which we will create patterns, toiles, and possibly finished garments for. Exciting!

For those who aren’t sure, here are a couple of 1920s dresses from this amazing website.

Callot Soeurs dress

French beaded flapper dress

Think straight, angular silhouettes, a boyish figure with a flat bust and low hips, and the waistline dropped to the hip.

Embellishments such as beading, sequins, embroidery and applique were popular ways to adorn garments.

By the 1930s the silhouette was much more feminine, emphasizing the natural form of the woman’s body. The waistline moved back up to its natural position, and many dresses were cut on the bias. This meant that the fabric clung to the body, hanging in a smooth vertical drape.

Here are some stunning examples by Madeleine Vionnet.

So here is my moodboard:

And here are the drawings I have done so far from this inspiration. I was trying to think about what I wanted to learn about (bias-cutting), what I would actually wear (more likely a day dress), what would flatter my shape most (1930s), and what would look pretty (sparkles!).

Does anyone have any favourites – I’m only allowed to choose one!

Image sources
http://www.burdastyle.com/blog/pulling-from-the-past-wedding-gown-inspiration
http://www.coletterie.com/fashion-history/madeleine-vionnet-sculptural-modeling
http://collections.vam.ac.uk/item/O74062/evening-dress/ 

Basic Bodice Block

This term in my Pattern Cutting class we are working on the bodice. From what I’ve been led to believe, this is slightly trickier than skirt patterns that we were working on last term.

So far we have understood where all the measurements for the bodice come from, and then drafted a basic bodice block using a standard size 12.

Hopefully I won’t get in trouble for using these, but I thought it might be useful to see how a basic two-dart bodice comes together from a flat piece of fabric. It helps explain why we have darts where we have darts.

As far as I know, all images are from Basic Pattern Skills for Fashion Design by Jeanne Price and Bernard Zamkoff.

This first image shows a flat piece of fabric wrapped round the body to create a cylinder.

By creating cones of fabric, or darts, above the bust the fabric shapes to the body. These are called the shoulder darts.

The same is done for the waist. These darts are then turned inside and sewn. The flat version above is the pattern for the two-dart bodice. From this basic pattern or block you create different types of top.

I don’t think I’m quite up to explaining how to draft your own block, but if you’re interested then I found a Basic Bodice Block tutorial on the BurdaStyle website that looks quite good!

Tea anyone?

These last few months it has sometimes felt a bit like I’ve gone back in time – I’m back at school with regular lessons, I get half term and now the Christmas holidays, I have homework, and now I have started some work experience! Once a week I have started helping out Anna, who owns women’s wear label Phannatiq.

While our tastes in clothes are extremely different I am learning heaps every time I go. Far from being the tea-girl (I was that girl once. I don’t drink tea or coffee and cannot tell you what a stressful experience I found it), I am finding out lots about how to construct clothes, and getting to try doing new things. I am also getting an insight into the dedication and passion needed to run your own business!

On Tuesday I was tracing off pattern pieces for a toile (rough version) that Anna is working on at the moment.

She began by using an existing jacket toile to mark out the new design.

Each section of the jacket was then marked with a number (think this was more for my benefit than what is normally done!) and I then took the toile and pinned each section flat onto pattern paper.

Using a tracing wheel I traced each section on to the paper.

I then used a pattern master to draw the pattern piece out by following the dots the tracing wheel left.

Although seam allowance still needs to be added, this process created the individual pattern pieces to then make a new toile of the jacket.

My First Pattern

Despite my recent joy at being able to sew for me again, over the last couple of weeks my sewing has annoyingly ground to a halt from being ill.

This little inconvenience has made it quite difficult to think of things to blog about as I haven’t made anything, my lessons have now finished for Christmas, and sometimes I haven’t made it out of bed!

However, I realised today that I had forgotten to share something I was quite pleased with. In my last pattern cutting lesson I finished my first ever real-life proper could-actually-make-a-skirt-from-it-and-wear-it-out-of-the-house pattern!

Way back in September in our first lesson we were asked to choose a skirt we liked from a selection cut out of magazines. The intention then was to learn lots over the term, and be able to turn the photo of the skirt in to a pattern. This is the one I chose:

I chose it both for it’s colour and simplicity, and I think I secretly wished I was the girl in the photo – very glamorous 🙂

When it came to creating the pattern, I started by making a skirt block to my own measurements in full-scale. It’s been rolled up for a while so please excuse my slippers and the fabric at the top weighing it down.

The block is then used to create the master pattern, where you do all your workings out etc. When doing this it became apparent that my blocks weren’t quite right.

Despite measuring myself, I managed to put the hip line in too low (it should be about 21cm, I had put mine in at 25.5cm) and I hadn’t shaped the waistline at the top. I rectified both of these things in the master pattern below.

The photos aren’t brilliant, but hopefully you can get the idea that it is here on the master pattern that I made all the changes to the basic block shape that I wanted to create the right pattern for the skirt. I have made lots of scribbles and notes as to why I have done things.

Essentially it is just a simple straight skirt with a pleat down the front. The pleat is the hatched area on the right.

At first I drew the pleat straight down, but to make it hang better I moved it outwards at the bottom by 1cm. This also moved the grainline and centre front (CF) slightly.

In order to be able to walk easily in the skirt I moved the centre back (CB) line out by 1cm at the bottom, and extended the front and back by 3cm (this is a standard measurement to use, although I couldn’t tell you why!) on each side from the knee. By doing this it meant I didn’t have to have a seam down the back to then be able to make a split for easy walking.

Extending CB out by 1cm

Extending sides by 3cm at knee

As I had decided that I didn’t want the back to have any seams or a zip, I have marked where an invisible zip would go on the left side. Initially I had had it on the right with a seam down the CB.

Once all that jiggling around was done, I taped the master pattern down to the table so that I could then trace off a final skirt pattern, omitting all of the scribbles and things I didn’t need.

So here is my first ever finished proper pattern, with a waistband, all ready to be made in to a real life skirt!

Admittedly it was a much simpler skirt than some others in the class, but it’s nice to see how to put together everything that we learnt in the term. Well done me!

Runny Yokes

I have been a bit lazy it recording my Pattern Cutting lessons recently, so it’s time for me to try and explain what I have been learning again!

Recently we looked at skirt yokes. For those that are unsure, a yoke is a shaped piece at the top of a skirt that usually comes lower down the skirt than the waistband would. Yokes can also be used on other garments, but here I will just be looking at them on skirts (because that is all I know about!). Yokes are a design feature, used to add more interest to a skirt. Here are a few examples:

1950s Butterick 6499 Vintage DRESS Pattern Stand Up Collar  SLIMMING Yoke Skirt  Bust Size 34 Uncut FF

McCalls 3129 Sewing Pattern Misses Yoke Skirt Medium

To create a yoke, a section is cut away from the skirt block. It is within this cut away section that you can close the darts so that they don’t interfere with the yoke design.

So to start with we worked on the pattern for a simple yoke like this.

As ever, we began by drawing round our block (I am using the block for the front of the skirt), putting in the hip line, dart etc. The desired yoke line was then drawn in, touching the bottom of the dart.

With the Centre Front of the skirt marked (admittedly, it should be a bit nearer the actual CF line!), two balance marks were also added to helped with lining things up when the yoke and the skirt are joined together again in construction.

We then cut along the yoke line, separating the yoke from the skirt.

The next step was to close the dart to remove it from the yoke.

After cutting out the skirt part as well, and then adding seam allowance, you have a skirt pattern with a yoke. The back can remain as it was if you wish, and once you have created a yoke, you can alter the skirt as you want. Read my post on creating a fuller skirt to find out more.

If the yoke / design line cuts through the end of the dart (image below), you can follow the instructions above, closing the main part of the dart in the yoke.

You would then get rid of the small end of the dart by creating ease between the two balance marks when sewing. This may create a slight gather.

If the design / yoke line is below the end of the dart, you can extend the dart point to the design line and then close it. If you don’t do this, by only using the original dart it will cause the bottom of the skirt to open more.

Here you can see the shorter original dart, and the new longer one that reaches the design line.

Close the dart and add all the correct markings – another finished yoke skirt pattern! This type of alteration will create a slightly tighter skirt.

To find out a bit more about yokes in general, check out Gertie’s Style Dictionary.

Image sources
http://www.anthropologie.eu/uk/page/home
http://www.etsy.com/listing/46531898/1950s-butterick-6499-vintage-dress
http://www.ioffer.com/i/mccalls-3129-sewing-pattern-misses-yoke-skirt-medium-31860311

Grainlines

I hope you are all sitting comfortably today, and are ready to concentrate as I think I may be about to confuse us all!!

I am going to attempt to explain grainlines after being taught about them in my Pattern Cutting class a few weeks ago. I honestly do think I understand them in practice, but trying to explain them to you in an easy to understand way might be a bit beyond me (those that are far more knowledgeable on such matters feel free to point out any errors). Here goes though!

I drew a little diagram in a past post, which shows the main things to understand about the construction of fabric. Here is a more professional one as a reminder:

On a pattern the grainline is shown by a straight line with an arrow at each end. Here they are the lengthwise grain, the crosswise grain and the bias grain.

These straight lines should always be parallel to the selvedge edge when laying out pattern pieces. This is done by using a ruler to ensure each end of the grainline is the same distance from the selvedge / selvage.

I am going to tackle each of the grainlines individually to try and explain them a bit more in regards to skirts. Essentially, the grainline that is used affects the way that the skirt will hang.

Lengthwise / Straight grain

This image shows the front of a skirt. It is cut using the straight grain through the centre front / middle. The lines indicate this grainline, and the red line with arrows shows what would appear on your pattern.

By cutting the fabric this way, along the warp, the skirt will hang straight and the sides will go out.

Bias Grain

The bias grain is 45 degrees to the original grainline. It means the fabric will hang in a softer way, and pull to the body. This grainline has the most stretch and give.

You can also achieve interesting results using the bias grain on patterned fabrics. Imagine this was a checked or striped fabric on the front of a skirt.

Gore Grain

The final grainline we were taught about was the gore grain. This grainline can be used if the skirt is made of four pieces, and the grainline is put through the middle of the leg.

It was a popular grainline in the 1940s as it didn’t waste as much fabric as using the bias grain, but was much more flattering than using the straight grain which can look a bit like a triangle!

McCalls 9215

It is created by marking the centre point between the centre front and side of the pattern piece, and the centre point on the hem. You then join these two points with a straight line and this is the gore grain.

You can also create a bias gore grainline which is 45 degrees to the gore grainline.

I found this diagram helpful in summing everything up.

Now, once you have got your head round all of that and done your hair, you are ready to place your patterns and get cutting 🙂

Image sources
Singer Sewing Book, 1969
Basic Pattern Skills for Fashion Design, Bernard Zamkoff and Jeanne Price
http://www.dressaday.com/2007/09/could-this-be-the-one.html
http://3hourspast.blogspot.com/2011_05_01_archive.html