My 1940s Dress

Just like me in general, my blogging has become awfully slow recently! With only two months, almost to the day, to go until our little wriggly baby arrives I am feeling somewhat cumbersome these days and everything is taking me a bit longer than it used to!

Even though I’m not making very much at home, I’m still going to college so I thought I’d share with you where I’ve got to with my 1940s dress.

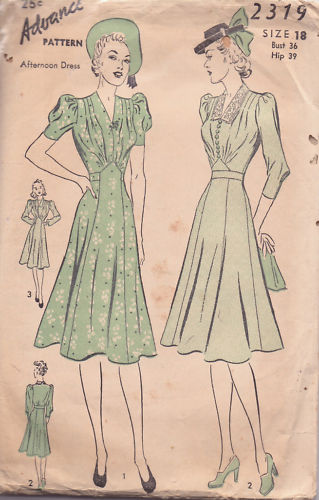
Having found a squillion patterns that I love at The Vintage Pattern Store, I managed to narrow the choice down to this one.

Originally I was going to use the existing pattern to make a toile and then a final dress, but a couple of factors changed my approach:

1) The point of a toile is to check for fit before making the real garment. However, when you look like this, it is unlikely that many things are going to fit you no matter how many toiles you do…

2) Pattern cutting is the element of all the courses that I do that I enjoy the most, and want to learn the most about. So just using an existing pattern won’t help me develop those skills very much.

SO, instead I am creating the dress pattern from scratch using the image above as reference. I have my pre-pregnancy measurements so am using them in the hope that one day I may shrink back to normal size! I can then compare my pattern with the original at the end to see how we approached things differently. I’ll also make a toile once I’ve done the pattern, but won’t be able to fit it for a while!

So far I’ve used the same bodice block as I did for my 1930s dress, and created a basic dress block. It is then from these that you make adjustments to create the different elements of the dress – that’s the fun bit!

This is the front of the dress, with all the different bits still in one piece. The next stage is to isolate each section (eg skirt, or bodice), and then make any adjustments needed.

This is the bodice pattern piece.

I then moved the bust dart to the shoulder to allow me to create the pleats on the shoulder of the dress.

There are a few stages in between, but in the photo below I have added the shoulder pleats to the pattern, and opened out the bottom of the bodice to create the gathers at the front of the dress where it meets the waist.


See, I look just like the model in the illustration!

1940s patterns – which one to choose?!

Next week I go back to school, and I am doing a course called Vintage Fashion: 1940s and 1950s.

For the course we are required to bring a 1940s or 1950s inspired pattern, so I have spent the last little while looking on eBay at 1940s patterns! While I know that 1950s style dresses suit me well I already own a couple of dresses and patterns, and think there might be more scope for learning new techniques in the 1940s dresses.

Here are some of my favourites – most of which come from The Vintage Pattern Store eBay shop. If you click on the image it should take you to the eBay listing itself.

Now all I need to do is decide which one to get!

My 1930s dress toile

You may or may not remember long long ago in January when I told you about the 20s and 30s inspired pattern making course I have been doing this term.

I started by gathering inspiration, and then came up with the one on the left as my final dress design.

With the sleeves to be beaded something like this.

Rather than design and make a dress that would rarely get worn, my intention was to make a slightly more practical dress. However, a practical dress meant that I wouldn’t learn as much, so practicality went out the window! I lengthened the skirt to floor length, cut it on the bias (at a 45 degree angle to the normal grainline), and added a more shaped dropped waistline. A whole new dress really!

I made the pattern to my pre-bump size so am not actually able to fit it at the moment. This means I have only made it to the toile (rough) stage. And this was it before my lesson this morning…

It is very rough, and the cheap and nasty polyester that I got to do the toile either doesn’t press or melts under the iron, so it was a tough job getting all the seams looking anywhere near good!

By making this toile I was able to see what needed altering on my pattern to make it work better. For example, I had sewn the bust darts too long, so altered my paper pattern by shortening them by 2cm.

You can also see from the photo that the sleeve is a bit flat and isn’t scalloped yet like my initial design.

To remedy this I first marked three points on the sleeve and slashed up towards the shoulder.

I then added more fabric under the existing sleeve to add extra width.

The next step was to measure how much fabric I had added, and transfer this to the paper pattern. In the case of the middle slash, I needed to add 4cm.

By doing this for all three slashes, and then taping pattern paper into the gaps, I had created a fuller sleeve.

I then added the scalloped shaping and toiled the new sleeve. Much better!

I found this bracelet that I made, and am wondering if something like this would be nice on the sleeve edging (you need to use your imagination a bit for this – I only pinned it on!).

In a similar way to altering the sleeve, I also dropped the neck a bit but will have to make my final decision when I can get in to the toile to see exactly where I would like it to sit.

I also learnt about cutting and sewing on the bias, ways of finishing vintage dresses rather than lining them, and some other stuff, but I think I might save all that for other blog posts so that I don’t bombard / bore you with them all today!

Have a good weekend everyone!

Image source
http://vintagetextile.com/new_page_155.htm#bot

New York, New York!

As predicted I can safely say I ate more than my, and the baby’s, fair share of food whilst in New York!

This photo does risk proving what a questionable role model I am going to be when it comes to table manners, but I have decided we are all friends here so it is safe to show you. Dave also kindly posted it on Facebook, so it is already out there anyway!

These had to be by far the best cupcakes I have EVER tasted – Sno Cap Cupcakes from Magnolia Bakery. Almost worth the cost of a flight just to eat one I would say (although not recommended if you’re trying to impress someone, about to romantically propose outside Tiffany’s etc).

Now, on to New York-y sewing-ish related things. I didn’t buy any fabric this time as I still have some left from a previous trip, instead I got this little beauty…

Look – even Peggy has been admiring it in all its sparkly glory!

Found on sale in a vintage shop in Williamsburgh, I could just about get in to it a week ago with a little help from the lady in the shop. I am guessing I won’t be able to now though as my bump is blossoming (no, it’s not twins thank you very much Walter The Bell-Boy, hummmmph).

Instead I will have to save the dress for after the baby is born in July. So if anyone fancies planning some kind of event that I can wear it to in the autumn I would be very grateful!

Looking at the design and the details I would estimate it is from the 1960s. The zip is metal which is often an indicator, as apparently plastic zips came in in the 1970s.

Much, if not all of the dress is handmade to a really high quality by a company called The Needle Craft, Atlantic City. A quick search hasn’t really uncovered much about the company except that The Needle Craft Shop was owned by Ruth Preis Bloom and her husband Maurice Bloom from 1934 until 1980. According to a press notice for her funeral in 2009, it was “…a widely known destination for designer women’s clothing…”.

I think all in all you’ll agree this is a highly practical dress for me to be wearing as a new mum in the autumn 🙂 Definitely one for special occasions, but one that I just couldn’t resist.

I also found this collar at a flea market which the seller suggested might be from the 1950s / 1960s.

A similar one sold on Etsy was dated as 1940, so who knows! I think I might try and make a really simple black shift dress to go with this.

And finally I bought a Tomberry! I have know idea if this pincushion is meant to be a strawberry or a tomato, or both, so I have officially renamed it the Tomberry.

This was dated by the seller as from the 1930s which I think is a bit questionable, but I’ve been wanting one for a while, and I love junk vintage collectibles so I don’t really mind when this is from – it looks nice on my shelf!

Oooooh, pretty…

The other day I was walking along the Strand when something big, red and dress-like caught my eye as I went past the uber posh Coutts bank building. On closer inspection, it was really was a big red dress in the window of a posh bank building.

According to Coutts:

“A red silk crepe strapless ballroom gown, designed by Ralph & Russo, forms the centrepiece of the display. The gown is a unique one-off design and features a full skirt which was hand embroidered with over 100 metres of feathered silk chiffon flowers, each created by hand. The gown took 12 couturiers and hundreds of hours to complete.”

The window display is pretty impressive as well.

You can see a few more snaps and some extra information on their Facebook page.

Finished project: New Look 6000

It turns out that not only does sewing cheer me up and take my mind off things when I’m down, but for once taking photos for the blog actually made me feel better too!

The other day I was feeling a bit blue about the fact that I’m slowly growing to the size of a whale, or small house (yes, I know I have a lot more growing to do yet – let’s just blame the hormones on this occasion!). The last thing I wanted to be doing was taking photos of me. So in order to try and get myself out of this mindset, I sat myself down and explained to me that I have a new dress to show everyone – a dress that I’m actually quite proud of. I also pointed out to me that if I am going to be turning in to a small house there is really no better reason than because you have a little person inside you. It is far better to be growing in to a small house for this reason than because you ate too many chips. So I then put myself in the shower, had another quick talk with myself (in my head you realise, I wasn’t just walking round the house mumbling away), did my hair and make-up, and got the camera set up.

Lo and behold, when I was ready and in my new New Look 6000 dress I felt much better about things. And here is the finished article!

I think I like this dress more than anything I have made so far. Not just because of the style, which is quite simple but sophisticated with a bit of a retro feel, but because I was able to put quite a lot of what I have learnt over the last few months in to practice. I was also able to see where I went wrong, and how to do it differently next time.

As I mentioned in my last post on the dress, after a little chat with Handmade Jane we decided that making this fitted dress out of a double knit (which is stretchy), should work even though I’m pregnant. I ended up getting really heavy jersey from Saeed’s Fabric’s as it was only £2 a metre as opposed to £8.99 a metre for double knit from the internet. I decided if I loved the dress enough to make another one then maybe I could splash out on the more expensive fabric later! Buying the cheaper fabric did mean I was restricted to black, but you can’t really go wrong with a black dress can you.

So, fabric bought and washed I decided again to cut out the dress in the biggest size to accommodate my bust and bump. Rather than make a toile I made the alterations either to the pattern before cutting, or directly on the final dress itself. And quite a few alterations I had to make! I think my mistake was that I forgot to account for the ease that had been added to the pattern for woven fabrics, and I didn’t need as much because I was using a stretchy fabric. I could have made the dress a couple of sizes smaller and it would still have had room for growth really.

I only worked that out after it was all cut and made though, so on I went with the many adjustments that were needed. Firstly the bust darts were down round my ankles! So they had to be moved up, and A LOT of excess fabric had to be removed either at the back seam or by making the darts bigger. This isn’t a problem at the moment as I can let them out as my tummy grows.

I also had to take the shoulders in a lot, which I did both on the pattern before cutting out the fabric, and then on the dress itself. It’s the same problem I keep coming up against due to my funny proportions, so next time I think I may have to bite the bullet, make a garment to my shoulder and normal body size, and then do a dreaded full bust adjustment!

By the time I got to the lovely collar everything was a bit mismatched so I adapted the collar to fit in a slightly different way at the back. I didn’t need to put in a zip because I can get the dress on and off fine as the fabric is stretchy. I also didn’t have to line it or do any of the facings due to the fabric (thanks Jane for pointing all of this out to me before I started!).

The beautiful brooch was a 30th birthday present from a friend! The pattern calls for a button, so I’m just waiting until the right button finds me before adding it.

And one final picture of me, the dress and the bump. And yes, I do realise looking at these photos that the bump isn’t as big as it is in my imagination 🙂

Jumping on the New Look 6000 bandwagon

After seeing the New Look 6000‘s popping up all over the place I decided for my next project I was going to come late to the New Look 6000 Frock Fest set up by Scruffy Badger, and make my own.

My first problem was my growing tummy, and the fact that this is a fitted dress. I need not have feared though as Handmade Jane came to the rescue! Jane made her NL 6000 from a bright red double knit, which I thought might just work for me as its a stretchy fabric. Jane also agreed and gave me a few pointers on how to make it – I could skip loads of steps basically – yay!!

So having got the fabric sorted, I was ready to start. Here was where I faced one of the most annoying problems in making your own clothes from commercial patterns. How the blinkin’ ‘eck are you meant to get them back in their teeny tiny little weeny envelopes once you’ve unfolded and used them??!.

Believe it or not, all that came out of the envelope on the top of the pile. There are quite a few different versions of this dress, which means there are lots of pattern pieces. Short of ironing each piece when it is folded to make it as flat as possible (which I certainly can’t be bothered to do!), this was the best I could manage.

Imagine my despair when I realised I’d cut the wrong bit out and had to take everything out again to find the right one…!

I have actually finished the dress now, but am waiting for a good hair day to take a photo to show you properly :-).

And if you scroll down a bit on the right of my homepage, I have added a new widgety thing for the  New Look 6000 Frock Fest, but am not sure it’s working quite right yet?

Image source
http://sewing.patternreview.com/patterns/42644

Little Red Georgette

Remember this pattern that I showed you weeks and weeks ago, in fact, probably last year even?

Well I finally finished it! I seem to be a little slow at everything I do these days, so it took a bit longer than I had planned, but here it is.

I knew that I was pregnant when I chose the pattern back in December, and while it isn’t maybe something I would have chosen normally I thought the pleats would work really well with my expanding belly.

Thankfully I started the dress with making a toile.

I know I’ve moaned on about it before, but I’m finding sizing a bit tricky at the moment as my bust is quite out of proportion with the rest of me. Because of this I made the toile in the biggest size I had, a 14, as this was closest to my bust measurement at the time. By doing this my bust fitted perfectly. It meant that the rest of the dress was a little roomy, and I was able to slip the dress on with no closures (zips etc). The extra room is actually quite comfy at the moment so I decided to use a belt to give it more shape, and not having to put in a zip made the lazy in me very happy! The only alteration I did was to move the princess seams outwards a couple of centimetres so that they fell over the bust point and therefore looks like a much better fit.

I also decided not to have sleeves on the finished dress as I can then hopefully wear it for longer in to my pregnancy.

The georgette fabric I used was a bargainous £1 a metre from Saheed’s Fabric on Walthamstow High Street! All wonderful until it was hanging up to dry at home and I realised how see-through it is – not very appropriate for a preggers lady now is it?! This meant that I had to line it, which was a good learning experience for me as I had to work out how to attach the lining. The georgette was also the slippery-est (yes, am just making words up now I think) fabric I have used so far, and I did find it a bit tricky at times! The hems aren’t great because of this.

And here’s my little bump! It is a baby, promise, although I did eat rather a lot at the weekend so it could be mistaken for a food baby at the moment 🙂

Oh, and finally I kept some extra length at the front to allow for the bump to grow and keep the hemline even.

More of my drawings: 1920s & 1930s

On Fridays I have a class called Vintage Fashion: 20s and 30s. I love it!

What could be better than actually being allowed to spend a whole lesson in the library, just looking at beautiful dresses?

That’s what we did last week as research for our moodboards, which will then inspire our own designs, from which we will create patterns, toiles, and possibly finished garments for. Exciting!

For those who aren’t sure, here are a couple of 1920s dresses from this amazing website.

Callot Soeurs dress

French beaded flapper dress

Think straight, angular silhouettes, a boyish figure with a flat bust and low hips, and the waistline dropped to the hip.

Embellishments such as beading, sequins, embroidery and applique were popular ways to adorn garments.

By the 1930s the silhouette was much more feminine, emphasizing the natural form of the woman’s body. The waistline moved back up to its natural position, and many dresses were cut on the bias. This meant that the fabric clung to the body, hanging in a smooth vertical drape.

Here are some stunning examples by Madeleine Vionnet.

So here is my moodboard:

And here are the drawings I have done so far from this inspiration. I was trying to think about what I wanted to learn about (bias-cutting), what I would actually wear (more likely a day dress), what would flatter my shape most (1930s), and what would look pretty (sparkles!).

Does anyone have any favourites – I’m only allowed to choose one!

Image sources
http://www.burdastyle.com/blog/pulling-from-the-past-wedding-gown-inspiration
http://www.coletterie.com/fashion-history/madeleine-vionnet-sculptural-modeling
http://collections.vam.ac.uk/item/O74062/evening-dress/ 

Pleats Please

It seems that pleats and pregnancy are bestest buddies. Combine with some jersey and you’ve got three BFF’s for sure.

Pre-pregnancy I didn’t own anything made of jersey (a stretchy knit fabric that t-shirts are most often made from). I then made the Vogue V1179, a super comfy stretchy dress. And I’m sure I will be making many more jersey dresses to see me through.

I tried this one on in Topshop the other day:

Apart from my current lack of bump it fitted really nicely, but is costs 40 squids!! I know I’m a beginner, but I’m sure with a little help from somewhere I could make something very similar for a fraction of the cost. It’s only made of four pieces of fabric if that, how hard can it be? (Feel free to point and laugh when I find this impossibly difficult later on!)

I like the Topshop dress because apart from having space to expand at the front, overall the dress is still quite fitted which is much more in keeping with my usual taste.

I started this post meaning to show you the latest dress I’m working on, but seem to have got a bit distracted! I am making Vogue V8509, version B. It uses pleats to the max, hence the title of this post, and will hopefully accomodate my tummy as it grows, while still having a relatively fitted bust.

So far I have made the toile, and as predicted I need to increase the bust, and reduce the shoulder width. Luckily I have a copy of The Perfect Fit which I think will be able to guide me through these adjustments.

I have also overcome my fear of the dress form and am putting it to good use!