My 1940s Dress

Just like me in general, my blogging has become awfully slow recently! With only two months, almost to the day, to go until our little wriggly baby arrives I am feeling somewhat cumbersome these days and everything is taking me a bit longer than it used to!

Even though I’m not making very much at home, I’m still going to college so I thought I’d share with you where I’ve got to with my 1940s dress.

Having found a squillion patterns that I love at The Vintage Pattern Store, I managed to narrow the choice down to this one.
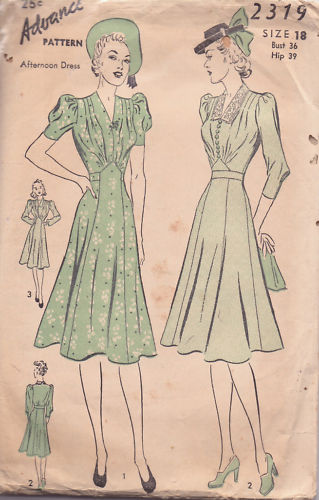
Originally I was going to use the existing pattern to make a toile and then a final dress, but a couple of factors changed my approach:

1) The point of a toile is to check for fit before making the real garment. However, when you look like this, it is unlikely that many things are going to fit you no matter how many toiles you do…

2) Pattern cutting is the element of all the courses that I do that I enjoy the most, and want to learn the most about. So just using an existing pattern won’t help me develop those skills very much.

SO, instead I am creating the dress pattern from scratch using the image above as reference. I have my pre-pregnancy measurements so am using them in the hope that one day I may shrink back to normal size! I can then compare my pattern with the original at the end to see how we approached things differently. I’ll also make a toile once I’ve done the pattern, but won’t be able to fit it for a while!

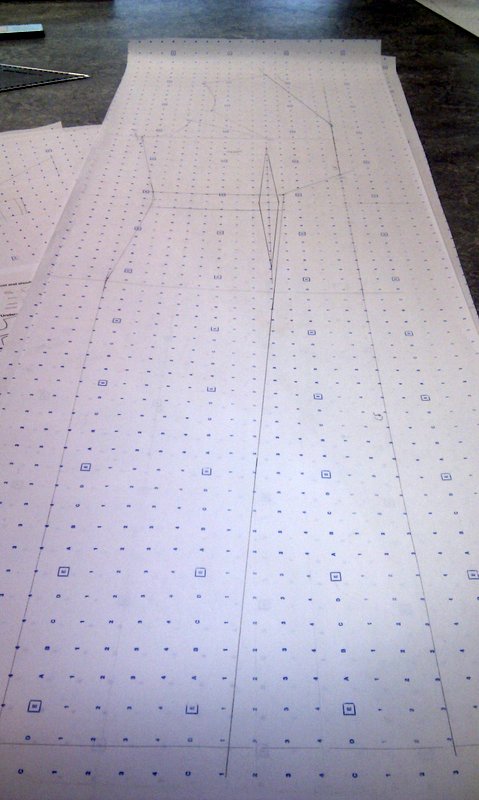
So far I’ve used the same bodice block as I did for my 1930s dress, and created a basic dress block. It is then from these that you make adjustments to create the different elements of the dress – that’s the fun bit!

This is the front of the dress, with all the different bits still in one piece. The next stage is to isolate each section (eg skirt, or bodice), and then make any adjustments needed.

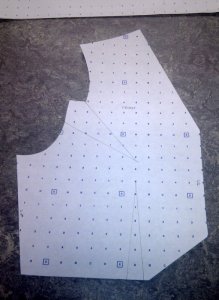
This is the bodice pattern piece.

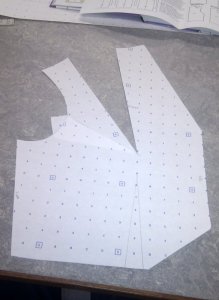
I then moved the bust dart to the shoulder to allow me to create the pleats on the shoulder of the dress.

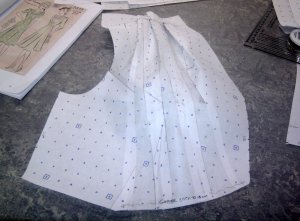
There are a few stages in between, but in the photo below I have added the shoulder pleats to the pattern, and opened out the bottom of the bodice to create the gathers at the front of the dress where it meets the waist.


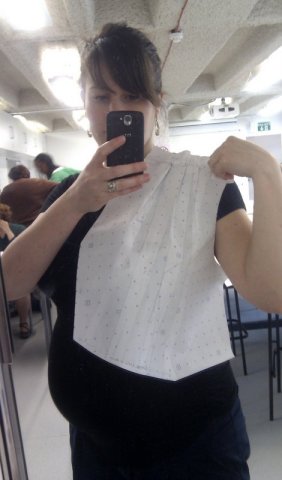
See, I look just like the model in the illustration!

1940s patterns – which one to choose?!

Next week I go back to school, and I am doing a course called Vintage Fashion: 1940s and 1950s.

For the course we are required to bring a 1940s or 1950s inspired pattern, so I have spent the last little while looking on eBay at 1940s patterns! While I know that 1950s style dresses suit me well I already own a couple of dresses and patterns, and think there might be more scope for learning new techniques in the 1940s dresses.

Here are some of my favourites – most of which come from The Vintage Pattern Store eBay shop. If you click on the image it should take you to the eBay listing itself.

Now all I need to do is decide which one to get!

Finished Project: Mum’s maternity top

I think I may be nearing the end of being able to make clothes at home for a while :-(. I have to cut the fabric out on the floor and it’s getting a little tricky to bend down without squashing the baby!

I will hopefully be able to enlist some (Dave) help to make at least one more thing I’d been planning, but for now I have just finished the 1980s maternity top using my mum’s pattern from when she was pregnant with me.

I made the middle top, with elements of each of the other dresses.

I was really pleased with everything I’d learnt and how well I’d been able to do it – from rouleau loops (see the tutorial I did here), to my first collar, to making the front buttony bit (not sure what that’s called!) neat on the outside and inside – you can’t see any seams or anything from inside!

Then I went to shorten the sleeves and realised I’d been a bit over zealous with the overlocker and got a bit of the left (right in the top photo) sleeve itself trapped in the seam, hence the horrible crease you can see in the photo! Thankfully it’s not as noticeable when on I don’t think, especially if I turn that arm away from the camera…!

The style is obviously not meant to be figure hugging, but even so I took quite a bit of fabric out at the back seam to make it slightly more flattering – it is part baby and part fabric making it stick out that far!

While it’s not a top I would necessarily choose if I wasn’t pregnant, I learnt lots in its construction, and it’s nice to have used one of my mum’s patterns!

My 1930s dress toile

You may or may not remember long long ago in January when I told you about the 20s and 30s inspired pattern making course I have been doing this term.

I started by gathering inspiration, and then came up with the one on the left as my final dress design.

With the sleeves to be beaded something like this.

Rather than design and make a dress that would rarely get worn, my intention was to make a slightly more practical dress. However, a practical dress meant that I wouldn’t learn as much, so practicality went out the window! I lengthened the skirt to floor length, cut it on the bias (at a 45 degree angle to the normal grainline), and added a more shaped dropped waistline. A whole new dress really!

I made the pattern to my pre-bump size so am not actually able to fit it at the moment. This means I have only made it to the toile (rough) stage. And this was it before my lesson this morning…

It is very rough, and the cheap and nasty polyester that I got to do the toile either doesn’t press or melts under the iron, so it was a tough job getting all the seams looking anywhere near good!

By making this toile I was able to see what needed altering on my pattern to make it work better. For example, I had sewn the bust darts too long, so altered my paper pattern by shortening them by 2cm.

You can also see from the photo that the sleeve is a bit flat and isn’t scalloped yet like my initial design.

To remedy this I first marked three points on the sleeve and slashed up towards the shoulder.

I then added more fabric under the existing sleeve to add extra width.

The next step was to measure how much fabric I had added, and transfer this to the paper pattern. In the case of the middle slash, I needed to add 4cm.

By doing this for all three slashes, and then taping pattern paper into the gaps, I had created a fuller sleeve.

I then added the scalloped shaping and toiled the new sleeve. Much better!

I found this bracelet that I made, and am wondering if something like this would be nice on the sleeve edging (you need to use your imagination a bit for this – I only pinned it on!).

In a similar way to altering the sleeve, I also dropped the neck a bit but will have to make my final decision when I can get in to the toile to see exactly where I would like it to sit.

I also learnt about cutting and sewing on the bias, ways of finishing vintage dresses rather than lining them, and some other stuff, but I think I might save all that for other blog posts so that I don’t bombard / bore you with them all today!

Have a good weekend everyone!

Image source
http://vintagetextile.com/new_page_155.htm#bot

Peggy’s Pickles branches out

Today is the official launch day of Peggy’s Pickles Vintage over on Etsy! Woopee!

I’ve been photographing and listing some of the dresses that I already had and some new ones I’ve found, and am pleased to be able to tell you that they are now for sale in my new little shop.

I hope you’ll pop on over for a quick look, and all being well I’ll be updating gradually with any new things I find (admittedly my initial stock list was about double but I found I couldn’t bear to part with some of the dresses I’ve bought over the last few years!).

My favourite dress on sale at the moment is this blue scalloped dress.

1980s royal blue fitted scalloped neckline dress, small

I also love this little 1960s minidress that I found on a trip to Portland, Oregon last year!

1960s Lilac mini-dress, small / medium

It’s all a bit new to me, so if you have any helpful comments or suggestions they are very welcome.

Happy shopping!

New York, New York!

As predicted I can safely say I ate more than my, and the baby’s, fair share of food whilst in New York!

This photo does risk proving what a questionable role model I am going to be when it comes to table manners, but I have decided we are all friends here so it is safe to show you. Dave also kindly posted it on Facebook, so it is already out there anyway!

These had to be by far the best cupcakes I have EVER tasted – Sno Cap Cupcakes from Magnolia Bakery. Almost worth the cost of a flight just to eat one I would say (although not recommended if you’re trying to impress someone, about to romantically propose outside Tiffany’s etc).

Now, on to New York-y sewing-ish related things. I didn’t buy any fabric this time as I still have some left from a previous trip, instead I got this little beauty…

Look – even Peggy has been admiring it in all its sparkly glory!

Found on sale in a vintage shop in Williamsburgh, I could just about get in to it a week ago with a little help from the lady in the shop. I am guessing I won’t be able to now though as my bump is blossoming (no, it’s not twins thank you very much Walter The Bell-Boy, hummmmph).

Instead I will have to save the dress for after the baby is born in July. So if anyone fancies planning some kind of event that I can wear it to in the autumn I would be very grateful!

Looking at the design and the details I would estimate it is from the 1960s. The zip is metal which is often an indicator, as apparently plastic zips came in in the 1970s.

Much, if not all of the dress is handmade to a really high quality by a company called The Needle Craft, Atlantic City. A quick search hasn’t really uncovered much about the company except that The Needle Craft Shop was owned by Ruth Preis Bloom and her husband Maurice Bloom from 1934 until 1980. According to a press notice for her funeral in 2009, it was “…a widely known destination for designer women’s clothing…”.

I think all in all you’ll agree this is a highly practical dress for me to be wearing as a new mum in the autumn 🙂 Definitely one for special occasions, but one that I just couldn’t resist.

I also found this collar at a flea market which the seller suggested might be from the 1950s / 1960s.

A similar one sold on Etsy was dated as 1940, so who knows! I think I might try and make a really simple black shift dress to go with this.

And finally I bought a Tomberry! I have know idea if this pincushion is meant to be a strawberry or a tomato, or both, so I have officially renamed it the Tomberry.

This was dated by the seller as from the 1930s which I think is a bit questionable, but I’ve been wanting one for a while, and I love junk vintage collectibles so I don’t really mind when this is from – it looks nice on my shelf!

Vintage Maternity Patterns

It had to happen some time really!!

As a fan of vintage clothes and patterns (for the pictures at the moment, have never actually sewn one!), I have been doing a bit of exploring on Etsy to see what might be out there for me to try or buy.

Here are some of my favourite patterns so far.

This pattern is from Zombarella, and I’ve been admiring it for a few months now. While it looks great in the illustration, my main concern is how tent like it might make me look.

FREE SHIPPING Vintage 1950 Simplicity 3196 Sewing Pattern Maternity Dress and Bolero in Misses Size 12 Bust 30

Now, I’m not entirely sure where these women are hiding their bumps, or how they are managing to have a waistline, so I would be intrigued to get this pattern just to understand how it even works!

Vintage Misses Maternity Dress with "Let-Out seams" Simplicity Pattern 6590 Complete 1966 size 10, Stylish

I love this dress from Cherry Corners! And the one below from Classic Cabin.

Maternity One-Piece Dress in Misses' Sizes, Vintage 1965 Sewing Pattern- Simplicity 6023

And finally here is a slightly more modern 70s number below, from Erika With a K. I think the maxi dress on the left would be super comfortable in the summer when I am HUGE!!

1970s Maternity Dress Top - Vintage Sewing Pattern McCall's 4637 - 38 Bust UNCUT

Now all I need to do is narrow down these and the 20 or so others I’ve found, and decide which ones to buy. Hope no-one beats me to it!

Image sources
http://www.etsy.com/shop/Zombarella?ref=seller_info
http://www.etsy.com/listing/41929444/free-shipping-vintage-1950-simplicity
http://www.etsy.com/listing/77767835/vintage-misses-maternity-dress-with-let
http://www.etsy.com/listing/89698714/maternity-one-piece-dress-in-misses
http://www.etsy.com/listing/89279861/1970s-maternity-dress-top-vintage-sewing

More of my drawings: 1920s & 1930s

On Fridays I have a class called Vintage Fashion: 20s and 30s. I love it!

What could be better than actually being allowed to spend a whole lesson in the library, just looking at beautiful dresses?

That’s what we did last week as research for our moodboards, which will then inspire our own designs, from which we will create patterns, toiles, and possibly finished garments for. Exciting!

For those who aren’t sure, here are a couple of 1920s dresses from this amazing website.

Callot Soeurs dress

French beaded flapper dress

Think straight, angular silhouettes, a boyish figure with a flat bust and low hips, and the waistline dropped to the hip.

Embellishments such as beading, sequins, embroidery and applique were popular ways to adorn garments.

By the 1930s the silhouette was much more feminine, emphasizing the natural form of the woman’s body. The waistline moved back up to its natural position, and many dresses were cut on the bias. This meant that the fabric clung to the body, hanging in a smooth vertical drape.

Here are some stunning examples by Madeleine Vionnet.

So here is my moodboard:

And here are the drawings I have done so far from this inspiration. I was trying to think about what I wanted to learn about (bias-cutting), what I would actually wear (more likely a day dress), what would flatter my shape most (1930s), and what would look pretty (sparkles!).

Does anyone have any favourites – I’m only allowed to choose one!

Image sources
http://www.burdastyle.com/blog/pulling-from-the-past-wedding-gown-inspiration
http://www.coletterie.com/fashion-history/madeleine-vionnet-sculptural-modeling
http://collections.vam.ac.uk/item/O74062/evening-dress/ 

Vintage Pattern Parade

Today I have completely been inspired by / copied Stitch & Witter’s Vintage Dress Parade from yesterday (make sure you take a peek at them, they’re beautiful), but I’m doing it with patterns!

Much like all the donations my Nan has made to me of her old sewing bits and pieces (who can forget the amazing hem marker!) and clothes, my mum and mother-in-law have also been passing things my way. In particular I have all of my mum’s old patterns that she made for herself. I’m not sure how happy she’ll be with me calling them ‘vintage’ in the title, but I thought you might like to see a few of my favourites.

If you can get over the hairstyles, I love the dress and shoes the girl in the middle is wearing. Not so sure about the other two outfits…

This one was my mother-in-laws. Very stylish!

I included this one as I really like the style of illustration.

I think this one might be my favourite, and hopefully I can make it sometime soon.

My Nan made the long dress for my Mum, my sister then wore it to a Jane Austen themed hen party, and I then got my hands on it and turned it in to this (because of the embellishment my Nan used, I think removing it was definitely an improvement!):

I’m not sure that all the patterns are big enough for me, or if all the pieces are still there, but there’s plenty to keep me busy! If and when I make any of them I’ll try and find out a bit more about them and let you know.